Contents
Introduction
ONIX (ONline Information EXchange) for Books is the international standard that publishers use to electronically transfer book industry product information to retailers and other publishers. ONIX, adopted by major booksellers enables book metadata to be communicated between different organizations even if they have different technical infrastructures and business requirements. It provides a standard XML template for organizing data storage.
This document describes the handling of the incoming ONIX Rel.3.0 data to create or update product data in Bookmaster and the generation of outgoing ONIX compliant data from the Bookmaster product data.
Incoming/Outgoing ONIX data
Incoming ONIX data will typically be coming from external book production and editorial systems or from book suppliers/publishers whose products will be sold in the Bookmaster system.
All incoming data will be validated and any errors encountered can be notified to the original sender.
User specific configurations are set up to convert or generate Bookmaster specific product fields from ONIX data that do not map directly to the Bookmaster fields. Interface data that are not necessarily relevant to the Bookmaster application system will be ignored. Product records will either be created or existing ones updated for valid data. For new and unapproved products in Bookmaster all the standards fields will be created or updated whereas for already active products only certain fields will be updated.
Since not all Bookmaster product fields can be derived from the ONIX interface, new products that are created will be flagged as unapproved to allow the user to review, amend, approve, and activate the record.
Outgoing ONIX data can be generated for a specific product or a group of products. Bookmaster fields that do not map directly to ONIX code list will be converted based on customer configured mapping tables.
A copy of what was sent will be stored in Bookmaster and only incremental changes will be sent for the selected range/s. However; an option will be provided to generate a full ONIX interface file.
Business rules setup
View business rulesThe following business rules have to be setup to handle ONIX process. Business rules for ONIX process must be setup with support from Iptor IP1 consultants. It is critical to understand the setting of control files and how it works. Control files must be setup correctly for the system to operate as intended. Any changes to the control files setup should be addressed cautiously and in consultation with Iptor IP1 consultants.
| Note | This document does not cover customised setup tasks of specific companies. Deviations from this setup should be covered by setup tasks written by individual companies. |
| Business rules | Setup |
| TMSDS/IM-MODSC Item Maintenance Options |
Add Item Maintenance option for ONIX Details. |
| TMSDS/LA-IMMU Limited access – item maintenance users |
Provide access to ‘ONIX Details’ option to the relevant users. |
| TMSBP/MNT-BS Maintenance options – Book ID |
Add ONIX maintenance option to be available from within Book Specification. |
| TMSBP/OPT-BOOK User options – Book ID |
Provide access to ‘ONIX Details’ option to the relevant User Roles. |
| ONIX/ON-FLD ONIX field |
This system defined control file has the mapped fields for ONIX extended data. It’s for information only. |
| ONIX/ON-FLDD ONIX field definition |
This control file has the detailed information for ONIX extended data fields. |
| ONIX/ON-LSnnn |
These control files list the valid ONIX code lists where ’nnn’ is the ONIX code list number. |
| ONIX/ON-TERn Sales rights territory |
These 3 control files define the sales territories, countries and regions. |
| ONIX/ON-IL Item level for ONIX data |
Maps the supplier (ONIX spec number P19) to an item level. |
| ONIX/ON-DIM Measurement conversion |
Setup the measurement conversion for outgoing data. |
| TMSWH/CNV-DIMN Conversion from item dimnsn to location dimnsn |
Maintain the conversion data for item & location dimensions. |
| ONIX/ON-TMPLI ONIX default item template |
This control file has the item template to use for various item fields when creating the item from incoming ONIX data feed. |
| ONIX/ON-IS Item supply definition |
Define the linked account type. |
| TMSDS/IM-EDTT Item Edition Type |
Holds the Bookmaster item edition type codes and the corresponding ONIX code list. |
| TMSDS/IM-IDSCP Item description prefix |
Lists the title prefixes. One of the ONIX requirements is to present book titles without the prefixes such as ‘The’, ‘A’ ,etc. |
| TMSDS/IM-IBCD Item barcode generation defaults |
Specify item barcode generation defaults if required. |
| TMSDS/IM-LANG Item language |
Language codes and the countries. |
| TMSDS/IM-STKR Stock report |
Update the ONIX product availability code to the stock report. |
| TMSDS/IM-IBORO Stock status ONIX mapping |
Map the Bookmaster stock status code to ONIX market publishing status (code list 68), publishing status (code list 64) and notification type code (code list 1). |
| TMSDS/IM-CT Contributor Type |
This control file defines the valid contact types that can be linked to a product and the conversion to ONIX code (code list 17). |
| TMSDS/TEXT-TYP Distribution text types |
Defines all the Bookmaster text types |
| TMSDS/TEXT-TY2 Distribution text subtypes |
Defines all the Bookmaster text subtypes |
| ********/ISO-CTRY Country code ISO 3166-1 |
Define the 2 character ISO country codes used by ONIX. |
| ********/ISO-LNG Language code ONIX code list 74 |
Define the 3 character ISO language codes used by ONIX. |
| ********/DE-SVR Server settings |
Define the network name the system refers to where all the document directories reside. When creating the interface ID for the import/export use this server setting. |
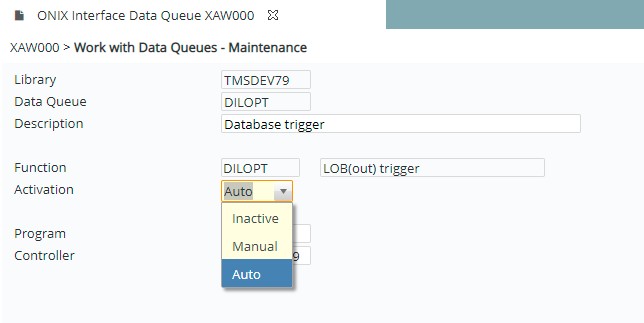
| TMSDI/LOB-DLVM Method of Delivery |
This is a system defined control file with the method of delivery Data Queue or FTP. |
| TMSDI/LOB-KEY Interface Key |
Define the interface key for the ONIX interface relationship with the database. |
| TMSDI/LOB-TRIG Interface Trigger |
This control file should have an entry for all data files that has ONIX data to be exported. |
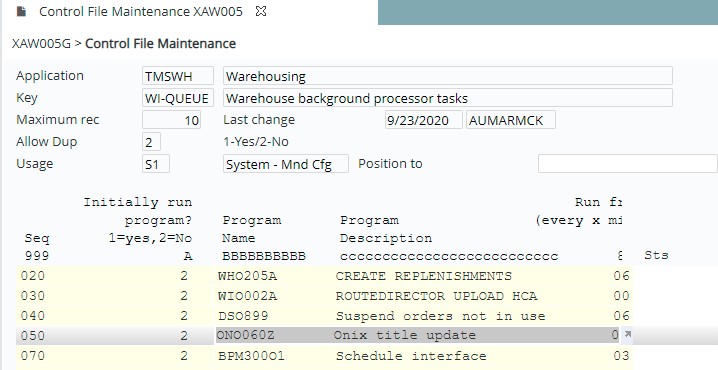
| TMSWH/WI-QUEUE Warehouse background processor tasks |
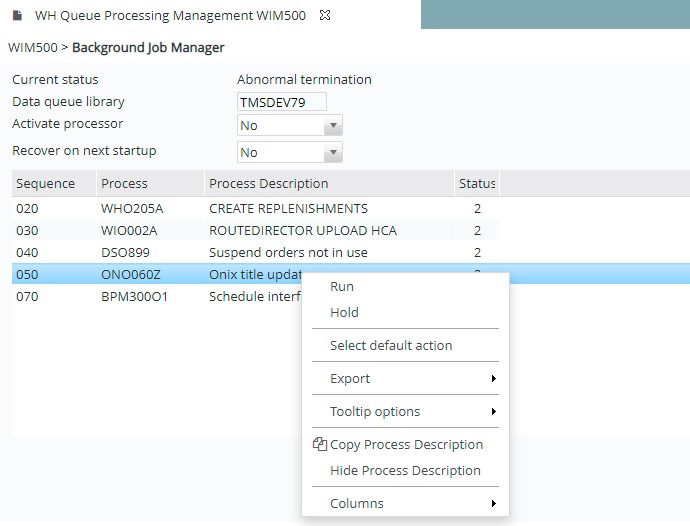
Add ONIX Title Export program (ONO050Z) to the background processor tasks. This control file must be set up if the Export is to run as a planned scheduled. If the ONIX Export is to be run when the background job processor is started, then set the column ‘Initially run program’ to ‘1’. Otherwise the program will be held until manually set to run in WIM500. |
| TMSDI/LOB-HIST Interface history purge |
Retention period can be setup if required for the interface history purge. |
Interface setup
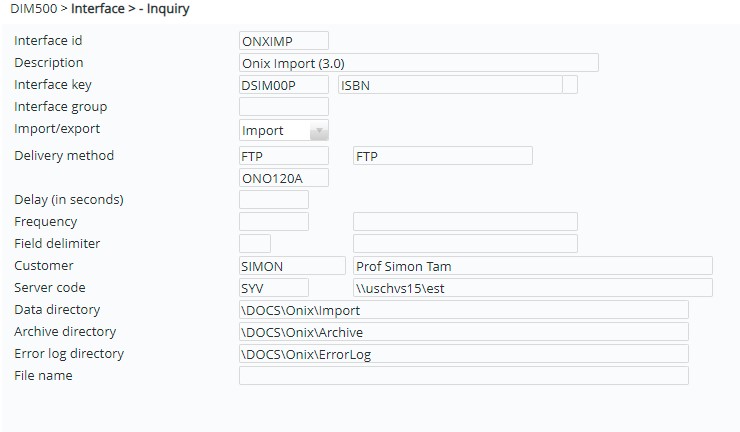
- Setup the following interface IDs for the incoming/outgoing ONIX data using the Interface Maintenance program DIM500. Menu: Other Options>Data Interfaces>ONIX: Interfaces>Interface Management>ONIX Interface Maintenance.
| Field | Description |
| Interface ID | 10 character user defined code for the interface. |
| Description | 40 char user interface ID description. |
| Interface key | ‘DSIM00P’ |
| Import/export | ‘I’ (import) |
| Delivery method | ‘FTP’ |
| Processing program | ‘ONO120A’ |
| Delay (in seconds) | ‘0’ (zero) |
| Customer | Customer code of the customer sending the ONIX feed |
| Server code | Virtual server where the incoming ONIX data is to be held. |
| Data directory | Data directory within the virtual server where the incoming ONIX data is to be stored. |
| Archive directory | Data directory within the virtual server where the original XML files are archived to after processing. |
| Error log directory | Data directory within the virtual server where errors can be logged. |
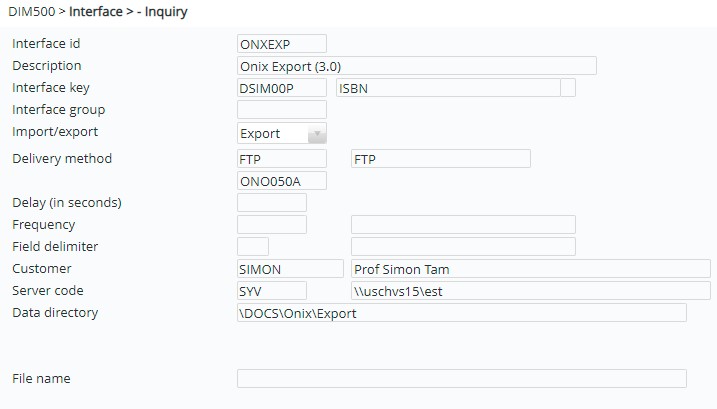
| Field | Description |
| Interface ID | 10 character user defined code for the interface. |
| Description | 40 char user interface ID description. |
| Interface key | ‘DSIM00P’ |
| Import/export | ‘E’ (export) |
| Delivery method | ‘FTP’ |
| Processing program | ‘ONO050A’ |
| Delay (in seconds) | ‘0’ (zero) |
| Customer | Customer code of the customer receiving the ONIX feed |
| Server code | Virtual server where the outgoing ONIX data will be held. |
| Data directory | Data directory within the virtual server where the outgoing ONIX data is stored. |
| File name | File name of the file within the above data directory that has the outgoing data. |
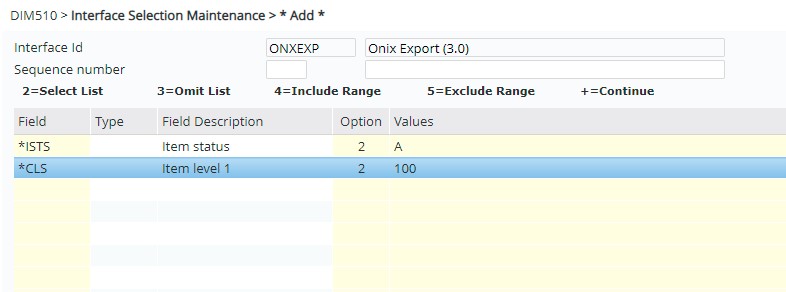
- Set-up the selection rules for interface IDs created in 1 above. This will determine which products will be included in the generation of the incoming/outgoing ONIX data. Below is a sample selection rule. In this example, we will be selecting all active products(*ISTS=A) with Item level 1 value of ‘100’ (*CLS=100).
Procedure
It is your responsibility to ensure that you understand this procedure before performing the following tasks.
| Note |
Deviations from this procedure should be covered by procedures written by your company. Before performing any tasks please ensure all the business rules are set-up accordingly. |
Capture ONIX data in IP1
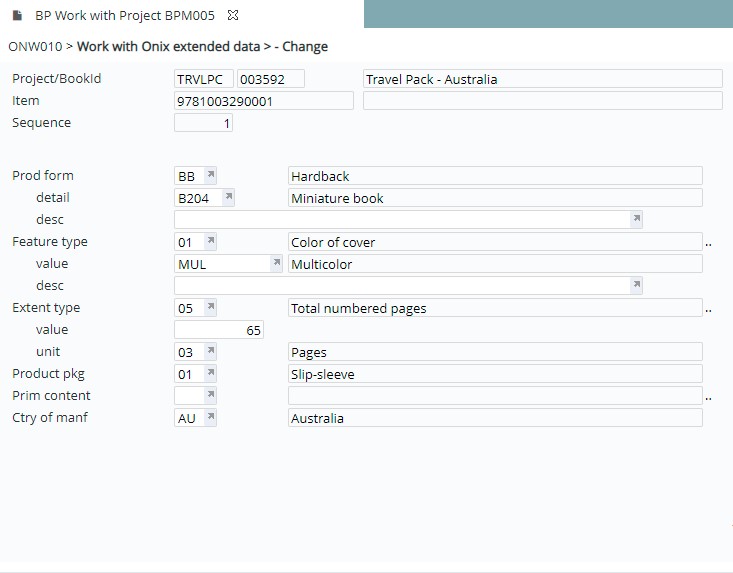
From within IP1 standard ONIX data for a title can either be captured in the Book Production system or in the Item Masterfile maintenance. The system allows to copy ONIX data from another title and update it as required or you can manually enter all the required information.
| Process | Steps |
| Capture ONIX data in Book Production |
|
| Capture ONIX data via Item Masterfile Maintenance |
|

Export ONIX data
ONIX data can be exported to XML files from IP1 using any of the following methods.
- manual process
- based on an interface trigger controlled by the user
- scheduled to run on a pre-determined frequency which can be on an hourly/daily basis or as required by the user.
The generated ONIX data in XML will be stored in the folder on the server that has been defined for the particular interface ID. From this location the data can be pushed to the customer. Above 3 methods are described below.
| Process | Steps |
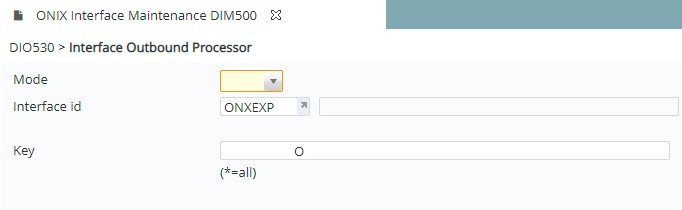
| Manual export of Onix data |
The Interface ID will be defaulted from the previous screen. |
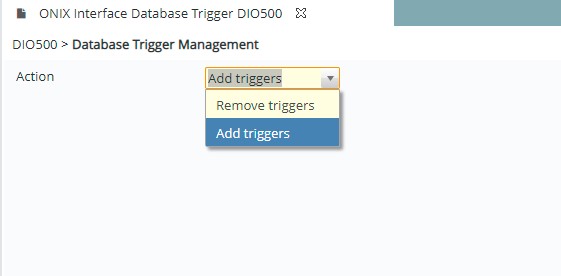
| Export based on Interface Trigger |
Export based on interface trigger can be managed by the user, whereby a trigger can be actioned so that any ONIX data changes are picked up for processing by the data queue.
|
| Scheduled export |
Export can be scheduled to run at a pre-determined frequency.
|

Import ONIX data
The incoming ONIX data (XML file – stored in a pre-defined folder in the system) can either be imported manually into Bookmaster or scheduled to run as a batch process.
| Process | Steps |
|
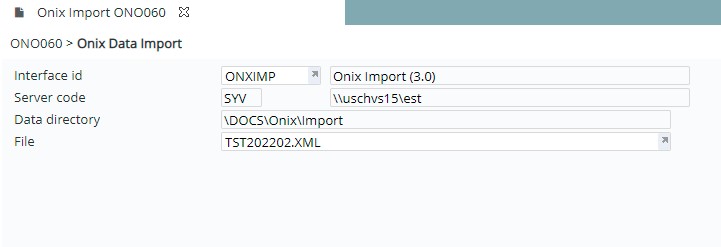
Manual Import of ONIX data |
Server & directory details will default from the setup. The XML file will default as well. |
|
Scheduled Import |
Import, similar to export can be scheduled to run at a pre-determined frequency.
The import processing program will validate and store the incoming XML data in the interface history log files. This program will also update the title master and any other relevant databases from the incoming ONIX data. Any new products created will be flagged with a stock status of ‘unapproved’ for review and approval. History logs can be viewed via DIM500 – Interface Maintenance program. Any encountered errors can be fixed and re-processed. |