Document Print Preference setup for Non-document Print control documents such as PO, allows the user to pick up correct Adobe Form, Printer etc. by the import function. For Document Print control documents such as INV, it defines print parameters when the document is printed automatically. The print preference is held in the Print Preference field.
For CSV documents, it allows you to maintain the document output format, i.e. define all the column data for the output document.
- To register Print preference for the output type expand menu: Base Modules> Distribution> Other> Document Printing> Print Management> and click Document Print Preferences.
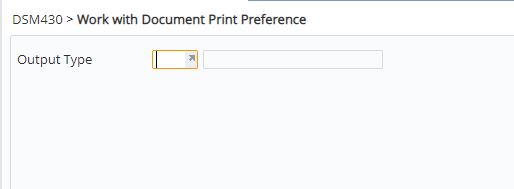
- Select the Output type (from ********/RPT-AEB ) and click OK. List of existing Print Preferences for the selected output type is displayed.
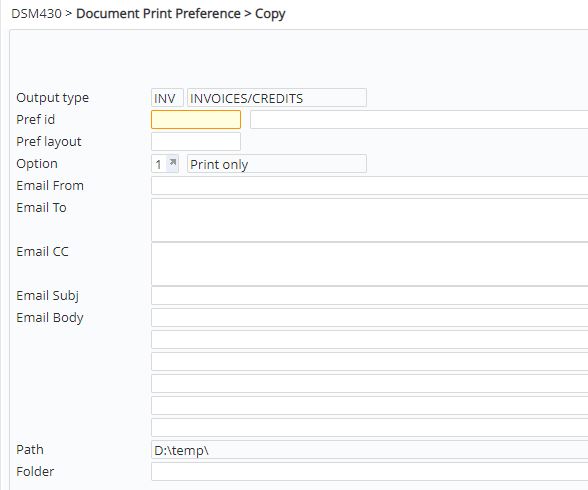
- To add a new print preference click function Add. Either panel A or panel B as shown below will appear depending on the setting in control file ********/RPT-AEE. By default panel A will appear allowing you to enter the print preferences, option and details as below. The number of lines allowed for the email body is limited in this default option. If a longer email body is required then ********/RPT-AEE should be setup accordingly, then panel B will appear with functionality to enter a longer email body..
Panel A:
Panel B:

- Enter the following input for the Document print preference setup. For email options (on Panel B), you can use Email function to enter the email details.
| Field | Description |
|
Pref ID |
Code for the print preference and a brief description of the code. |
| Pref layout |
Adobe Form ID for the PDF document or the Preference layout ID for CSV document. |
| Option |
These options are defined in control file ********/RPT-AEO. For PDF output, select one of the following: 2 = PDF email only 3 = PDF email or preview – if the email address is available then the document will be emailed otherwise it will be available for preview. 4 = PDF preview only For CSV output, select one for the following: 6 = CSV email only 7 = CSV email or preview – if the email address is available then the document will be emailed otherwise it will be available for preview. 8 = CSV preview only |
| Email from |
Applicable to email options only; email address that the document is emailed from (mandatory). |
| Email to |
Applicable to email options only; can be left blank to use email address retrieved by the specific print program e.g. customer/suppliers email address. Alternatively enter an email address to override the retrieved address. This is useful for testing purposes. |
| Email CC |
Applicable to email options only; optional CC email address |
| Email Subj |
Applicable to email options only; subject of the email (mandatory). |
| Email Body |
Applicable to email options only; any text to be included in the main body of the email (optional). |
| Path | Network path for archiving PDF documents. This is setup in control file ********/RPT-AEA against code ARC. |
| Folder | Folder name on the above network path for archiving PDF documents. |
- Click OK to save the Print preference. If the Option selected is for CSV document then the following panel will display.
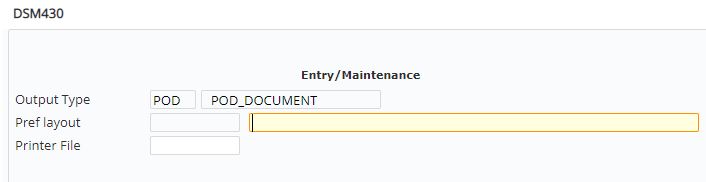
- Enter the Preference layout ID for CSV document and Printer file and click OK. DSM430 panel for CSV format entry appears.
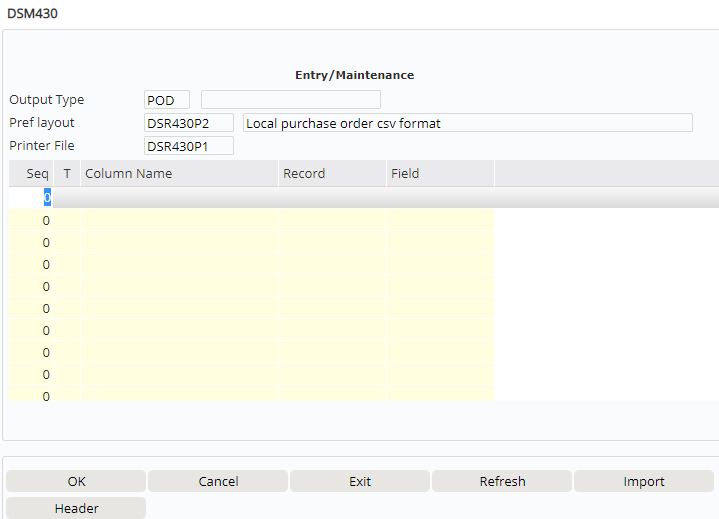
- Enter the following CSV format information.
| Field | Description | ||
| Seq | Display sequence for the column data. The columns on the CSV output document will display in this order of the sequence. | ||
| Type |
Type indicates the data type: H = Header information. All the fields that contain header information should be setup with type H. E.g. For a purchase order the data type for fields like Supplier, Supplier Name, Address etc. D = Detail line data. All the fields with order line detail data should be setup with type D except for key item. K = Key for the detail line data e.g. Item
|
||
| Column Name | Descriptive name for the column data. This is the column description that will appear on the CSV document. | ||
| Record/Field | This is the actual Record and Field in the printer file with the data. Select the Record and the Field from the Document print selection for the respective columns. |
- Enter the CSV format details and click OK to save the Document Print Preference.
