Introduction
AR payments can be made by a super biller (super buying group owner), covering multiple billing accounts across multiple customers using an excel upload file. The upload file must contain the invoice reference and the payment amount for the invoice. The system will find the referenced invoices associated with the group and apply the payment against each invoice. Excel file with the upload data must be in the nominated location\directory for the upload before you begin this process. Please refer to SOP Excel Upload and Download document for information on setting up network and folder details for the location of the import files.
Business rules setup
The following business rules have to be setup to process AR Payments via Super Biller. Business rules for this process must be setup with support from Iptor IP1 consultants. It is critical to understand the setting of control files and how it works. Control files must be setup correctly for the system to operate as intended. Any changes to the control files setup should be addressed cautiously and in consultation with Iptor IP1 consultants.
The purpose of this setup is to assist Iptor IP1 consultants and customers setup appropriate business rules at a customer site for the specified process.
| Note | This document does not cover customised setup tasks of specific companies. Deviations from this setup should be covered by setup tasks written by individual companies. |
| Control file | Setup |
| TMSAR/BK-PMUL1 Super account buying group | Define the super accounts and the Customer class type and the Class that are eligible for super biller payments. The upload will only be applicable for customers with customer classification setup in this control file. |
| TMSAR/BK-PMUL2 Super account selection options | Used by super account payment inquiry (ARE005) when searching and selecting documents for payment. |
| TMSAR/ARE005-6 Remainder payment action |
This is system defined control file that holds the 4 actions that can be taken to process the uploaded payment. These actions are:
|
| Template | |
| ARE005.xlsx |
Template supplied by Iptor for the payment upload excel file. The following information is required for the upload file as per the template:
|
Procedure
Load and process payments
Before activating the load process ensure the excel upload file has the correct data and the invoices to be paid are for customers belonging to the customer classification type as set up in control file TMSAR/BK-PMUL1.
- In the menu, expand Base Modules > Distribution > Debtors & Claims > Accounts Receivable > Entry and then double-click Debtor Cash/Journal Entry. ARE005 Cash / Journal Entry panel appears.
- On the Payment function field, select CSH for Cash entry from the drop down list.
- Click OK. Debtor Cash/Journal Entry entry header panel appears. Batch No/Period/Document Date will default. Document type/Payment type is dependent on Payment function field.
- Override the Entry option field (default Single account) to Load.
- Enter the remaining fields as required. For detailed information on any of the fields on this panel see ARE005 Cash journal entry.

- Click OK. The system will now prompt you to enter the upload file details.
- Enter the Excel file location and the filename. If there is more than 1 sheet in the excel then enter the sheet name, otherwise leave it blank.
- Click OK. The sheetname will default to Sheet1 if its blank.
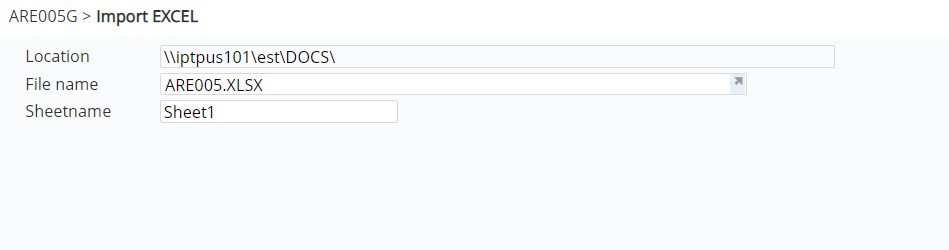
- You can use function Show Excel to view/check the excel file before upload.

- Click OK to upload the excel data. The system will display the Remainder/Remittance Entry panel with the uploaded payment amounts against the associated documents along with the action flag.

Note: If the action is blank on upload then and if an exact match is found for the invoice reference and the amount, the system will default the action type to 1=allocate to the referenced document, if reference is not found and the amount is positive then the action type will default to 3=Unallocate. If there are multiple documents with the same reference then an asterisk ‘?’ will display next to action to indicate multiple documents.
- You can overwrite the action if required, but note that for claim and dispute actions the amount must be negative.
- If the uploaded reference does not match, right click on the line and click Select Doc to select a document as required.

- After selecting the documents click OK. ARE210 Bank reference – Charge panel appears.
- Enter the payment reference details and click OK to process the payment.
For any positive payment amounts with action = 1 Allocate, the system will allocate the payment to the nominated/selected document.
For any negative payment amounts with action = 2 Generate claim, the system will create a claim transaction on the Daily Transaction Header file with the reference and value and the transaction will reflect as a claim in Debtors.
For any payments with action = 3 Unallocate, the system will create an unallocated record in the Debtors transaction file (to be allocated later).
For any negative payment amounts with action = 4 Dispute, the system will create a dispute journal for the payment amount, which can be taken up against a claim or written off or paid off later.
