Contents
Introduction
Adobe Experience Manager (AEM) Forms allows you to take IP1 forms data and generate PDF documents using Adobe Forms designer. The generated PDF can be printed or emailed as required and can be available for preview on XT client. CSV documents can also be generated and printed or emailed as required. All the PDF documents can be setup to be automatically archived within AEM or externally using Nextway archive solution as required.
This document is to guide you with the setup and procedural setups to print, email and preview PDFs/CSV documents. You can also view CSV/XML data stream in IP1 system for the generated documents.
Business rules
The following business rules have to be setup for Adobe AEM documents management. These business rules must be setup with support from Iptor IP1 consultants. It is critical to understand the setting of control files and how it works. Control files must be setup correctly for the system to operate as intended. Any changes to the control files setup should be addressed cautiously and in consultation with Iptor IP1 consultants.
| Note | This document does not cover customised setup tasks of specific companies. Deviations from this setup should be covered by setup tasks written by individual companies. |
Control files setup
The following control files must be setup if it’s not already setup as part of initial configuration.
| Control files | Setup |
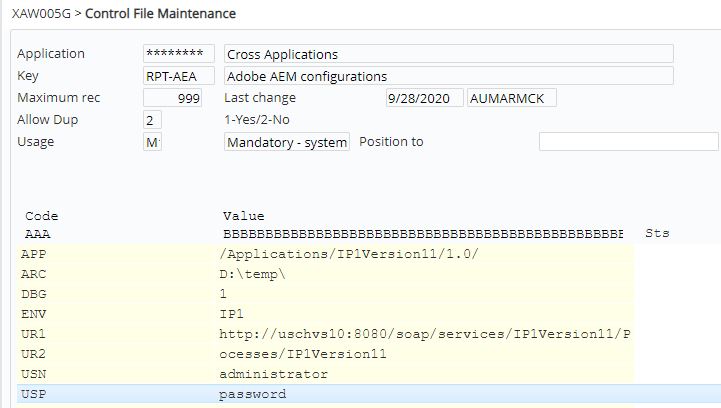
| ********/RPT-AEA Adobe AEM configuration | Adobe server settings for IP1 application/version. Similar to the server configuration control file ********/WX-CFG.
Note:
|
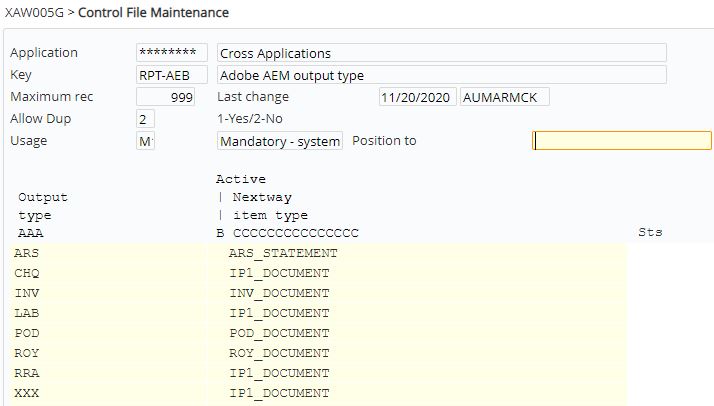
| ********/RPT-AEB Adobe AEM output type | List of output types valid for Adobe print function. This serves 2 purposes. One is to flag which documents are active for AEM processing and secondly it links the Document output type to the Item type in Nextway, if there is no link then the <ARCHIVE> section of XML will not be produced. If Nextway archiving is not used then leave column C blank.
For AEM processing the Output type must be flagged as active (blank is active).
Note: This control file also registers other document type (not available for Document print control), e.g. POD for PO. |
| ********/RPT-AEC Adobe AEM Generic Report Registry | List of programs that generate AEM PDF documents. |
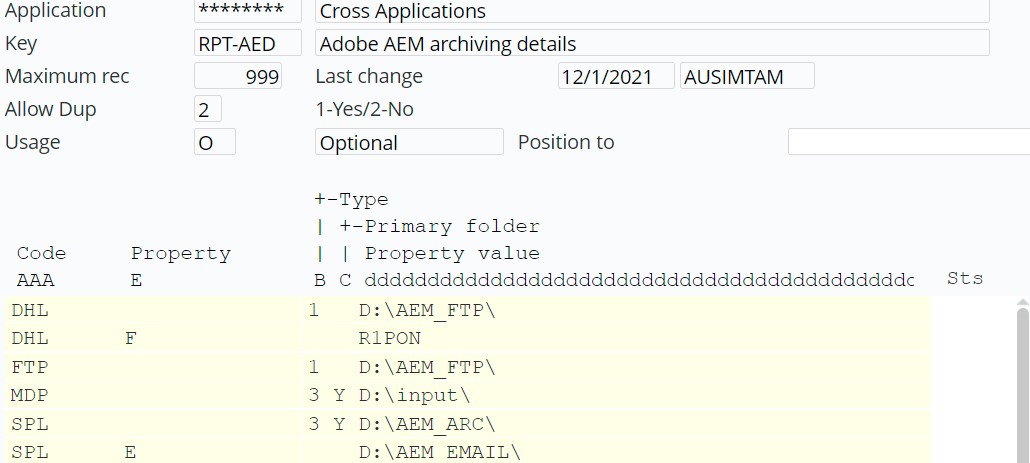
| ********/RPT-AED Adobe AEM archiving details | Holds the archiving location details for storing AEM documents. This is only for archiving storage options within AEM and is not applicable for Nextway archiving solution. It must be populated if control file ********/RPT-AEA has ‘*’ against code ARC.
Property E – allows for different folders or filenames; those with email address and those without email address. F – allows the use of spool file field value to formulate the filename for the PDF. Type – option to output PDF only or both PDF & XML. (XML is required in some instances for archiving purposes) Property folder – Y = primary folder for the archive Property value – folder where the PDF will be stored. |
| ********/RPT-AEE Adobe AEM Use Extended Email | Setup this control file to allow for longer email body when emailing PDF documents. Default setup only allows a limited number of lines. |
| ********/RPT-AEF Adobe AEM default form | The GL report writer can use different forms based on CPI (characters per inch) as defined in this control file. |
| ********/RPT-AEV Adobe Email Variable | Setup all the standard email variables to be used in the email data for AEM documents. |
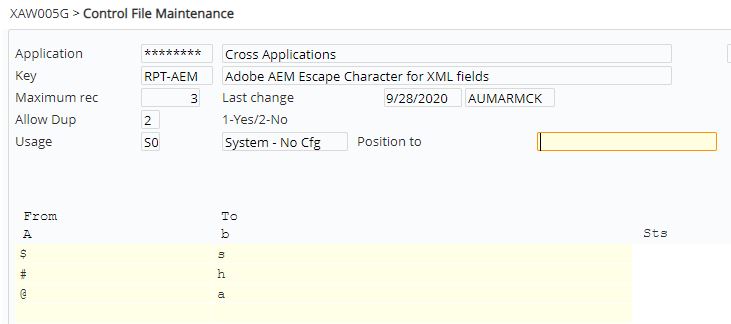
| ********/RPT-AEM Adobe AEM Escape Character for XML fields | Holds remapped printer file field name characters to XML acceptable characters (system defined).
|
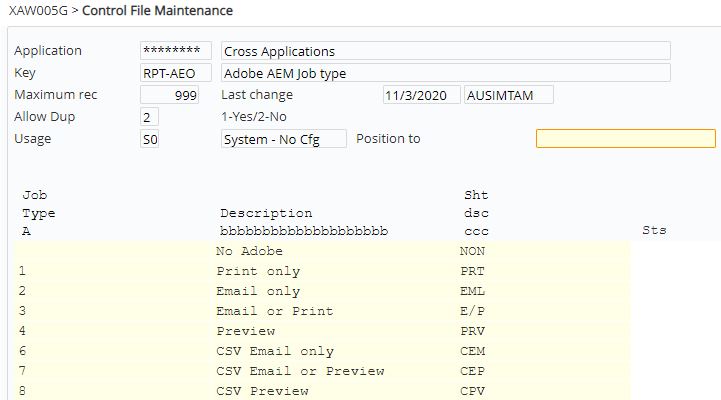
| ********/RPT-AEO Adobe AEM Job type | Holds all the form job types (system defined).
|
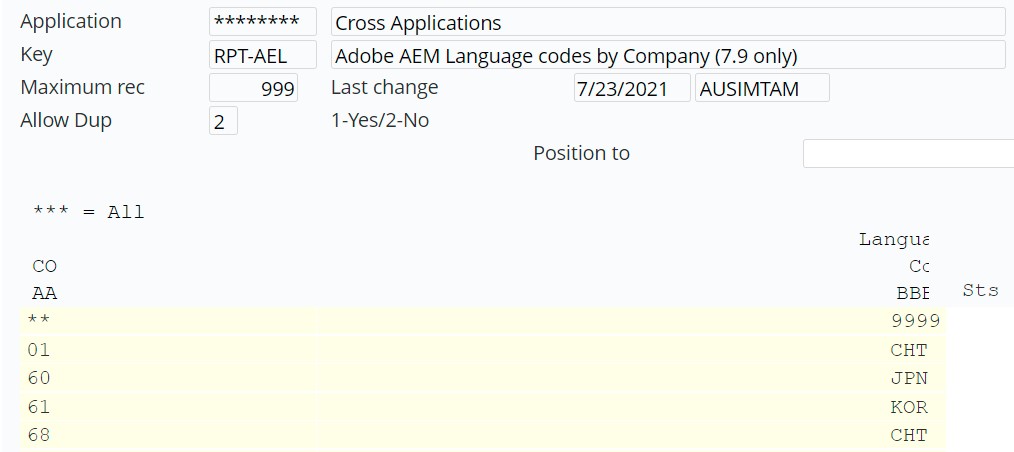
| ********/RPT-AEL Adobe AEM Language codes by Company | Holds language codes by company. Required if you have DBCS (Double-byte character set) data in 7.9.
|
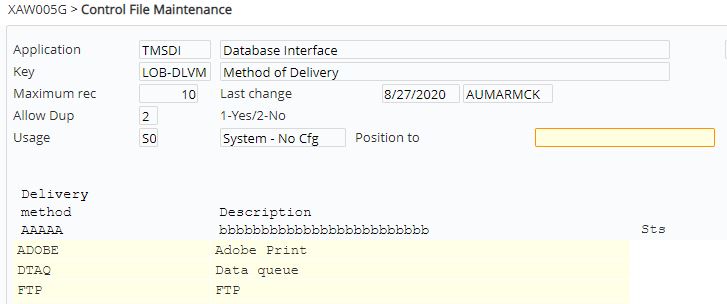
| TMSDI/LOB-DLVM Method of Delivery | LOB history will allow reprint (resend to ADOBE) if delivery method = ADOBE.
|
Procedure
It is your responsibility to ensure that you understand this procedure before performing the following tasks.
| Note | Deviations from this procedure should be covered by procedures written by your company. Before performing any tasks please ensure all the business rules are set-up accordingly. |
Setup Print preference
Document Print Preference once setup is used in Adobe forms in the following manner:
- For Non-document Print control documents such as PO, this enables the user to pick up correct Adobe Form, Printer etc. by the import function.
- For Document Print control documents such as INV, it defines print parameters when the document is printed automatically. The print preference is held in the Print Preference field.
- To register Print preference for the output type, expand menu: Base Modules> Distribution> Other> Document Printing> Print Management> and click Document Print Preferences.
For CSV documents, it allows you to maintain the document output format, i.e. define all the column data for the output document.
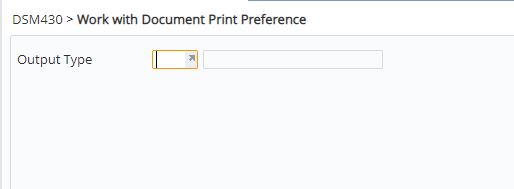
- Select the Output type (from ********/RPT-AEB) and click OK.
- Click function Add. Either panel A or panel B as shown below will appear depending on the setting in control file ********/RPT-AEE. By default, panel A will appear allowing you to enter the print preferences, option and details as below. The number of lines allowed for the email body is limited in this default option. If a longer email body is required then ********/RPT-AEE should be setup accordingly, then panel B will appear with functionality to enter a longer email body.
Panel A:
Panel B:

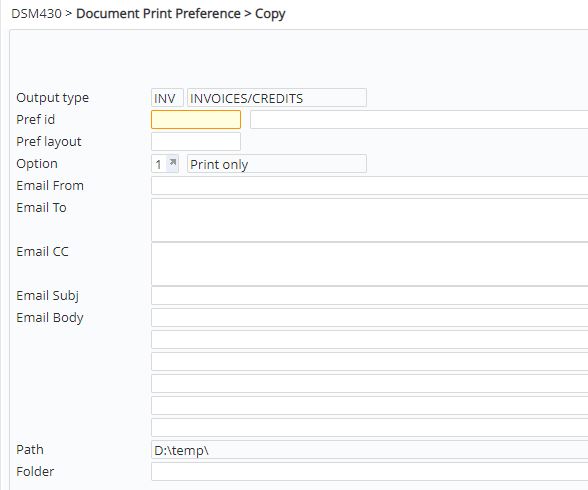
- Enter the following input for the Document print preference setup. For email options (on Panel B), you can use Email function to enter the email details.
| Field | Description |
| Pref ID | Code for the print preference and a brief description of the code. |
| Pref layout | Adobe Form ID for the PDF document or the Preference layout ID for CSV document. |
| Option | These options are defined in control file ********/RPT-AEO.
For PDF output, select one of the following: 2 = PDF email only 3 = PDF email or preview – if the email address is available then the document will be emailed otherwise it will be available for preview. 4 = PDF preview only For CSV output, select one for the following: 6 = CSV email only 7 = CSV email or preview – if the email address is available then the document will be emailed otherwise it will be available for preview. 8 = CSV preview only |
| Email from | Applicable to email options only; email address that the document is emailed from (mandatory). |
| Email to | Applicable to email options only; can be left blank to use email address retrieved by the specific print program e.g. customer/suppliers email address. Alternatively enter an email address to override the retrieved address. This is useful for testing purposes. |
| Email CC | Applicable to email options only; optional CC email address |
| Email Subj | Applicable to email options only; subject of the email (mandatory). |
| Email Body | Applicable to email options only; allows you to add text to be included in the main body of the email (optional). You can also use variables to populate the email body; use function F4=Search to select standard variables for the AEM document type as setup in control file ********/RPT-AEV. |
| Path | Network path for archiving PDF documents. This will default from the setup in control file ********/RPT-AEA against code ARC. It can be a single path as defined or ‘*’ for 2 locations. If 2 locations then use the next field to select the location from ********/RPT-AED. |
| Folder | Enter either the folder name on the above network path for archiving PDF documents or select the location from ********/RPT-AED. To have multiple embedded copies within a single PDF you can specify the number of copies in brackets after the folder name e.g. DHL-INV(4). |
- Click OK to save the Print preference. If the Option selected is for CSV document, then the following panel will display.
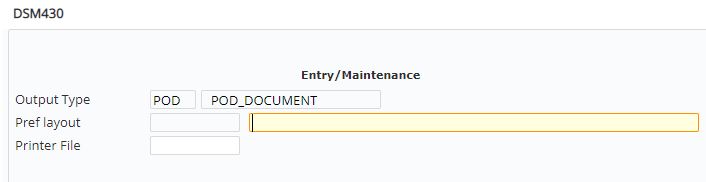
- Enter the Preference layout ID for CSV document and Printer file and click OK. DSM430 panel for CSV format entry appears.
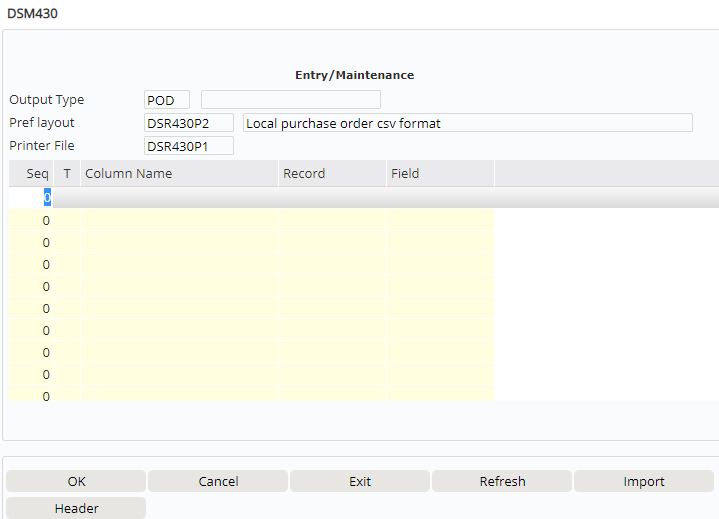
- Enter the following CSV format information.
| Field | Description | ||
| Seq | Display sequence for the column data. The columns on the CSV output document will display in this order of the sequence. | ||
| Type | Type indicates the data type:
H = Header information. All the fields that contain header information should be setup with type H. E.g. For a purchase order the data type for fields like Supplier, Supplier Name, Address etc. D = Detail line data. All the fields with order line detail data should be setup with type D except for key item. K = Key for the detail line data e.g. Item
|
||
| Column Name | Descriptive name for the column data. This is the column description that will appear on the CSV document. | ||
| Record/Field | This is the actual Record and Field in the printer file with the data. Select the Record and the Field from the Document print selection for the respective columns. |
- Enter the CSV format details and click OK to save the Document Print Preference.
Print PDF document
| via Document Print Control (DSM430) |
|

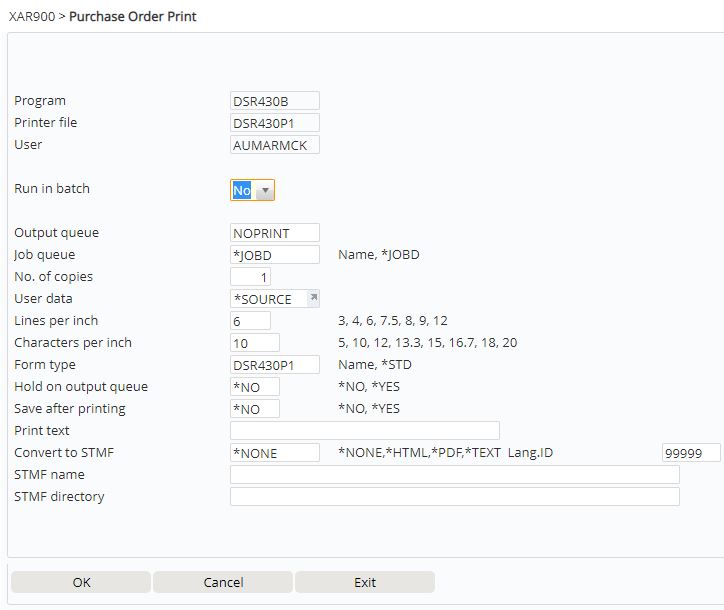
| via Report Submitter |
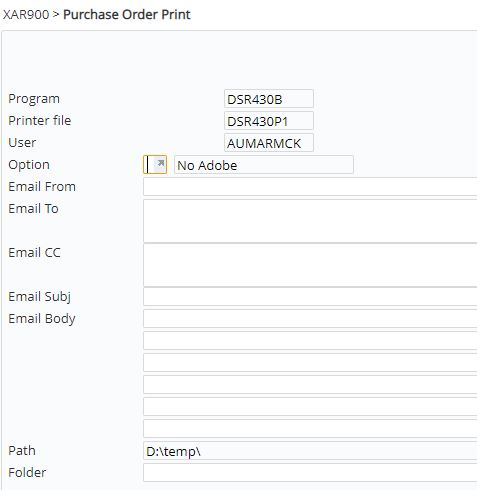
E.g. Purchase Order print
Note: Import will update all the user’s individual preferences from the selected template for a new user/program combination. Subsequent imports for the same user/program combination will update all except for the From, To, CC and BCC address fields. This is to make sure user does not accidentally email to someone else.
|
Email PDF document
|
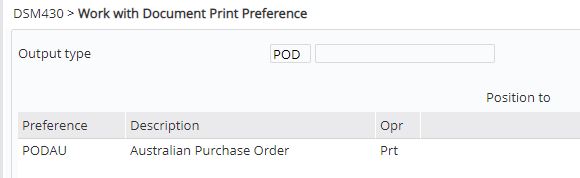
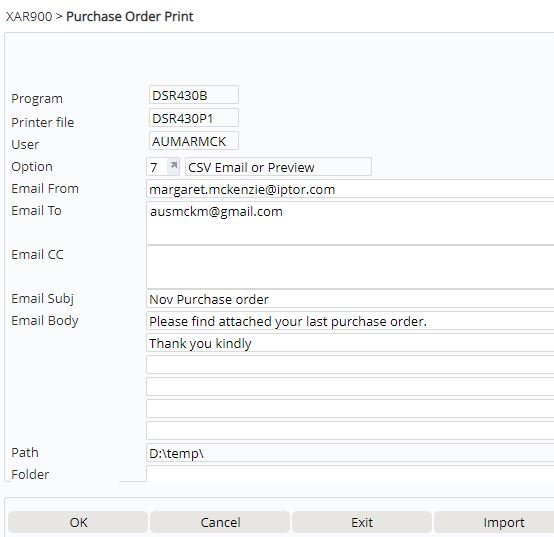
Preview/Email CSV file
E.g. Purchase Order print
|
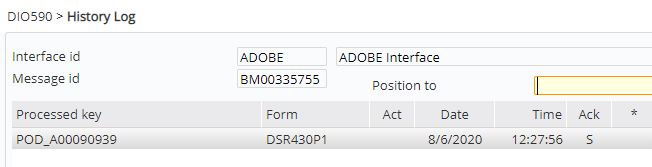
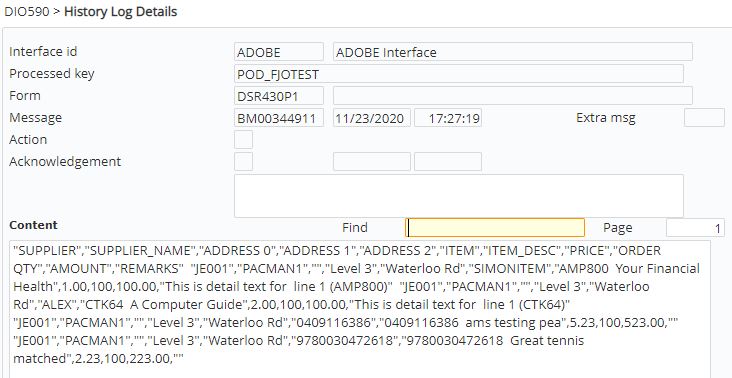
View/resend documents in interface history log
Print data is stored as XML data stream in the DI interface (ADOBE) in IP1. This allows you to view and investigate any problems in the Adobe interface and resend documents as required.
The following options are available on this panel:
Example: XML record (Detail):
Example: XML record (View):
Example: CSV record (Detail):
|

Batch processing of Adobe documents in history log
Batch processing bundles all the documents from a single Adobe interface run so it can be actioned together as a batch. It allows you to hold or release batches and update the priority of a batch so it can be processed with either a higher or a lower priority in the job queue. The background processor will continuously monitor the log and execute the documents as per the priority i.e. the priority is checked after each document print. This makes the process more efficient specially if there are multiple documents to process.
- Access Batch Processing via Menu: Other Options> Data Interfaces> DI:Interface> Adobe Print Batches.

All the batches are listed by date. The Count field displays the number of documents in that batch.
The following options are available on Adobe Print Batches panel.
- Detail – lists all the documents in the batch, with the option to resend any single document if required
- Maintain – allows you to change the priority of the batch so it can be processed with a higher or lower priority in the queue.
- Hold – allows you to hold the batch from processing.
- Release – releases the batch from held status.
- Resend – resends the batch for printing.
- Select the batch with any of the above options as required.
Archive/Storage options
Archive options
The following archiving options are available for IP1 PDF documents generated on AEM.
- Archive internally within AEM server – using the archive path in the IP1 document in the XML tag <PDFFOLDER>. This archive path is derived from the settings in control files ********/RPT-AEA & ********/RPT-AED.
- Externally using Nextway archive solution
Config.xml file on the AEM Workbench has a parameter to activate archiving of documents, <ARCHIVEPDF>Y</ARCHIVEPDF>. This must be set to Y for the application to call Archive sub process to archive the pdf files:
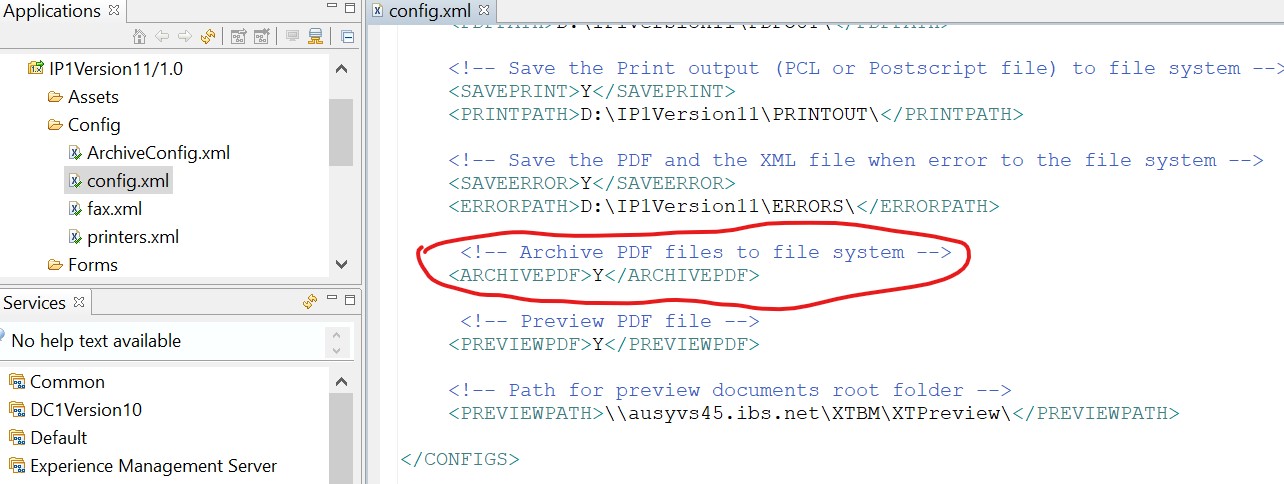
ArchiveConfig.xml file must be setup with the the following.
- Archive default path which will only be used for archiving if the archive path is not specified on the IP1 XML document.
- Nextway URL and access credentials (username and password) if using Nextway archiving solution.

XT Preview
Further to archiving, the PDF can be saved to the network folder for preview from XT client. The config.xml on the AEM Workbench has the following parameters that must be setup to activate preview of PDF documents on XT.
- <PREVIEWPDF>Y</PREVIEWPDF>
- <PREVIEWPATH> = document output folder path on the network for XT documents
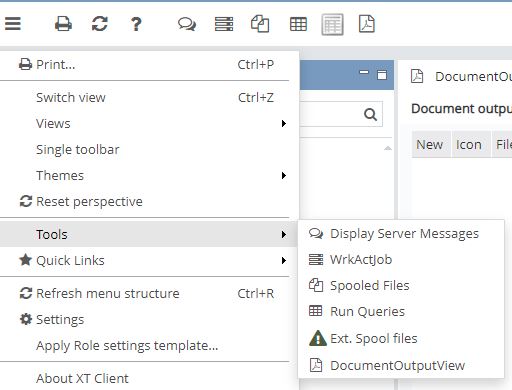
For all the setup details and activation of Document output view in XT UI please refer to IP1 Document Output Handling in XT UI document
DocumentOutputView function in XTUI enables users to view PDF documents generated in the IP1 system. Users can view only their own documents.
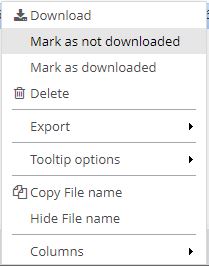
Your documents are displayed. Documents that have been added/changed since your latest use of this function are marked in the “New” column.
Downloaded documents are marked with green background colour. You can remove the mark by selecting option named ‘Mark as not downloaded’. Downloaded documents will also get a timestamp in column named ‘Downloaded’.
|


AEM LCA export-import
AEM LCA export-import can be used to create a mirror image of the production AEM application (LCA file) to another server (can be development or test server) as required.
Requirements
- Java application on the IFS
- RPG base program XAX006J
- Control file ********/RPT-AEA – setup with DRS record to identify target server
Instructions
- Call RPG program interactively or as a scheduled job.
CALL XAX006J PARM(‘ ‘ ‘ ‘)
PARM 1 = ENV (if blank then it will pick up current environment)
PARM 2 = (E)xport, (I)mport () both
If the program is called with the second parameter blank (i.e. it will do the export and import)
The program will
- Ask the Source Server (based on the control file in the environment you choose) to create a copy of the LCA
- Save it into the IFS
- Transfer the file to the target server
- Deploy the LCA
When running interactively you will see below messages, indicating the 3 stages were successful:
Export application completed with name: <name>
Import application with resource <name> is completed successfully.
Imported application <name> is deployed. Java program completed
Appendix
XML Schema
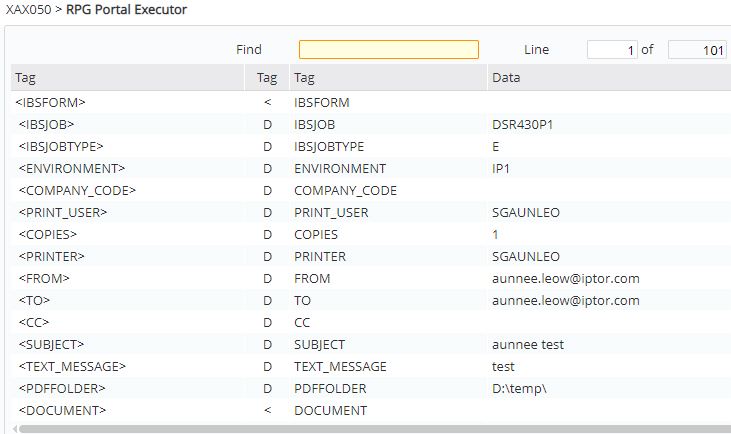
| ONE DOCUMENT PER XML | |||||||||||
| XML Controls | Comment | Example | Remarks | XAR900/XARPT | DSPCA | ||||||
| IBSFORM | Start of XML | ||||||||||
| IBSJOB | Form Layout id | DSR430P1 | From form type (if not *STD), otherwise use printer file name | PRTF/FRMT | PRTF/FRMT | ||||||
| IBSJOBTYPE | E=Email J=Print EJ=Email and print P=Preview |
E | From output option (new field):
Blank=Do not send to Adobe 1 = Print only (then archive) 2 = Email only (then archive) 3 = Email (if address available) or print (then archive) 4 = Send to XT preview user folder |
OPTN* | UDTA@DSPCD | ||||||
| ENVIRONMENT | Environment | 79P | ********/RPT-AEA/ENV
Usually indicate the 3 digits env code, Also used in Nextway for depository |
||||||||
| COMPANY_CODE | Company | 01 | Document company | ||||||||
| PRINT_USER | Job user | SGAENLEO | w#jbus | ||||||||
| COPIES | Print copies | 1 | CPY | CPY | |||||||
| PRINTER | Adobe printer | PRT003 | OUTQ | OUTQ | |||||||
| FROM | From email | From print_preference/runtime | EMLF* | UDTA@DSPCD | |||||||
| TO | To email (multiple email separated by ‘,’ | From print_preference/runtime,
otherwise from RPG print program |
EMLT* | UDTA@DSPCD | |||||||
| New | CC | CC email | From print_preference/runtime | EMLC* | UDTA@DSPCD | ||||||
| SUBJECT | Email subject | From print_preference/runtime | EMLS* | UDTA@DSPCD | |||||||
| TEXT_MESSAGE | Email body | From print_preference/runtime | EMLB* | UDTA@DSPCD | |||||||
| DRAWER | Not used | ||||||||||
| CMP_USER1 | Not used | ||||||||||
| CMP_1 | Not used, CMP_1, CMP_2 … | Not used | |||||||||
| CTL_1 | Not used, CTL_1, CTL_2 … | Not used | |||||||||
| New | PDFFOLDER | Archive location | FLDR* | UDTA@DSPCD | |||||||
| DOCUMENT | Start of document | ||||||||||
| R1CN | |||||||||||
| PRTDTL | Start of a line group | ||||||||||
| R1I | |||||||||||
| R1ORDQ | |||||||||||
| R1AMT | |||||||||||
| R1TEXT | Repeated element/pairs | ||||||||||
| R1TEXT | Repeated element/pairs | ||||||||||
| New | ENVIRONMENT | Environment | 79P | Repeat here for Fragment Processing | |||||||
| New | COMPANY | Company | 01 | Document company Repeat here for Fragment Processing |
|||||||
| PDFNAME | INV_A0000282_BM6475 | Derived from:
Outtyp_PKey_MsgK |
|||||||||
| New | ARCHIVE | Metadata section for Nextway Refer to Nextway(doc) |
|||||||||
| New | item | ||||||||||
| New | type | ||||||||||
| New | metadata | ||||||||||
| New | field | ||||||||||
| New | name | ||||||||||
| New | value:type | ||||||||||
