Contents
Introduction
AP-Medius interface process allows IP1 master data to be interfaced to Medius(cloud-based AP automation process), to automate invoice management process. Supplier invoices received into Medius are matched and validated against master data before valid and approved invoices are transferred to IP1 for AP payment processing.
Triggers can be set within IP1 to automatically export masterfile changes or it can be interfaced manually as required. Background processor in IP1 receives supplier invoices and interface acknowledgements from Medius and exports payment information to Medius. On a daily basis Interface management in IP1 allows you to view history log for the incoming/outgoing data and take relevant action, for example reprocess (import) or resend master data files as required.
Process flow
- Setup business rules:
- Setup & configure delivery methods for the different http requests to Medius (TMSDI/LOB-DLVM)
- Set up parameters for each delivery method setup in 1 (TMSDI/LOB-DLVP)
- Setup interface keys for each masterfile export to Medius (TMSDI/LOB-KEY)
- Setup interface triggers for masterfile data export as required (TMSDI/LOB-TRIG)
- Update TMSAP/PAYTERMS with any early payment discounts
- Update TMSWH/WI-QUEUE to include the following interfaces in the background processor:
- Medius invoice import
- Medius payment export
- Medius acknowledgement of masterfile export
- Setup interfaces
- MEDIUS Dimension Restriction (Account) – export
- MEDIUS Dimension 1 (Profit centre) – export
- MEDIUS Dimension 2A(Account Major) – export
- MEDIUS Dimension 2B (Account Minor) – export
- MEDIUS Payment Terms – export
- MEDIUS Supplier invoice – import
- MEDIUS Supplier invoice payment info – export
- MEDIUS Supplier – export
- MEDIUS Exchange rate – export
- Create and activate trigger data queue
- Review EOD program – if data queue is setup with activation option 2=Auto, then review EOD program.
- Activate the background processor for the following:
- Medius invoice import
- Medius payment export
- Medius acknowledgement of masterfile export
- Manage interface
- Export masterfiles manually if required
- Export supplier payment information manually if required
- Daily processes – monitor/review log & take relevant action i.e. reprocess/resend etc.
Business rules
The following business rules have to be setup to handle AP-Medius interface. These business rules must be setup with support from Iptor IP1 consultants. It is critical to understand the setting of control files and how it works. Control files must be setup correctly for the system to operate as intended. Any changes to the control files setup should be addressed cautiously and in consultation with Iptor IP1 consultants.
| Note | This document does not cover customised setup tasks of specific companies. Deviations from this setup should be covered by setup tasks written by individual companies. |
- TMSDI/LOB-DLVM Delivery method
3 different delivery methods must be setup for the 3 different http requests; masterfiles export, supplier invoice import and payment information export:
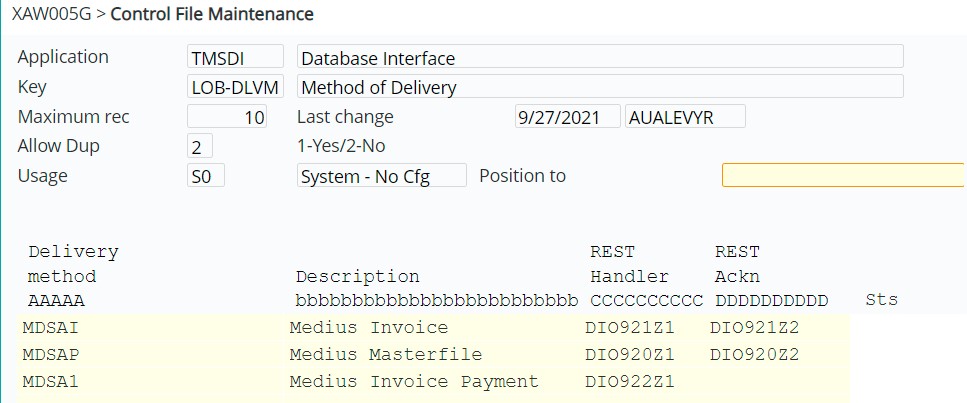
REST Handler specifies the interface programs for each delivery method.
Rest Ack specifies the acknowledgement program after importing/exporting for each delivery method.
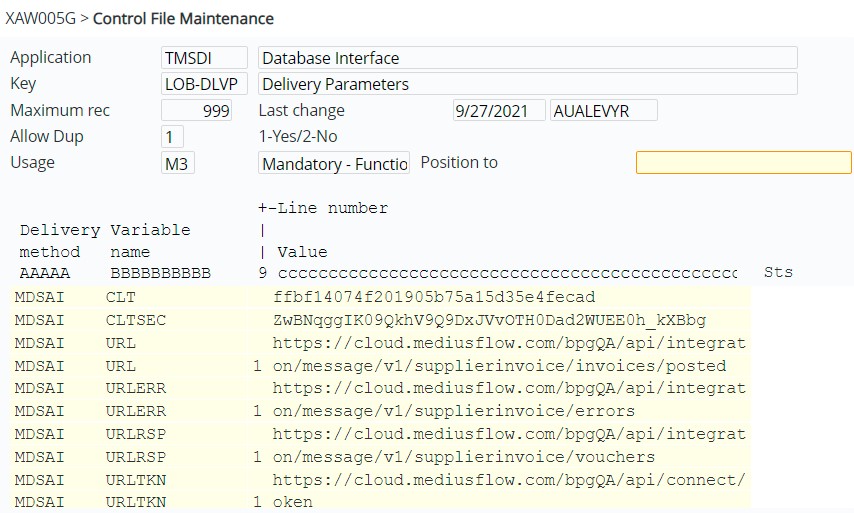
- TMSDI/LOB-DLVP Delivery parameters
For above delivery methods specify the following parameters for the http call:
- CLT Client ID
- CLTSEC Client secret
- CO Company ID
- ERP ERP ID
- URL REST URL – for initial request
- URLERR REST URL (Error response)
- URLRSP REST URL (Normal response)
- URLTKN URL for token
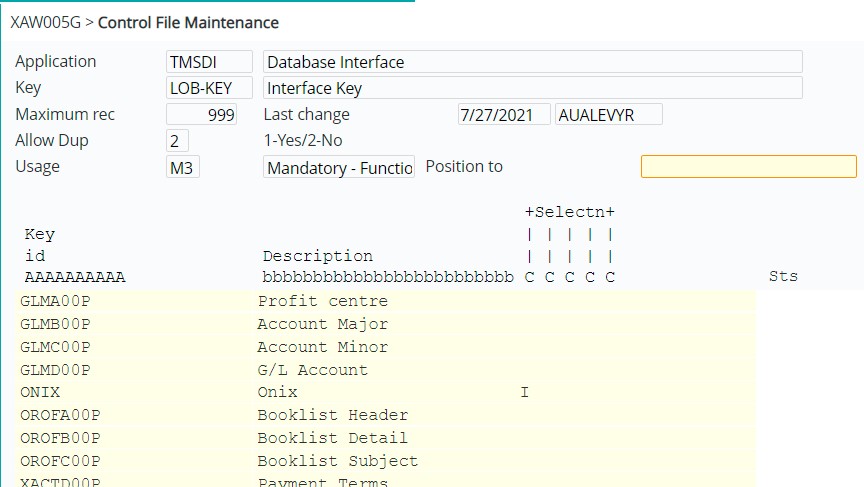
- TMSDI/LOB-KEY Interface Key
Setup Interface keys for each masterfile to be exported to Medius. These include
- GLMA00P Profit centre
- GLMB00P Account Major
- GLMC00P Account Minor
- GLMD00P G/L Account
- APCM00P Supplier
- XACTD00P Payment terms
- XAEXC00P Exchange rate
- TMSDI/LOB-TRIG Interface Trigger
Triggers are only for masterfile data export to Medius. If you want to trigger the interface to Medius then setup this control file for each masterfile export to Medius. Ensure the trigger is activated for each file (Active column =’Y’).
| Note | Even though theoretically you can set triggers for Payment terms and Currency exchange rate, these are fairly static data and and does not change much, hence there is no real benefit for setting the triggers for these 2 files. You can always deactivate triggers for any masterfiles as required. |

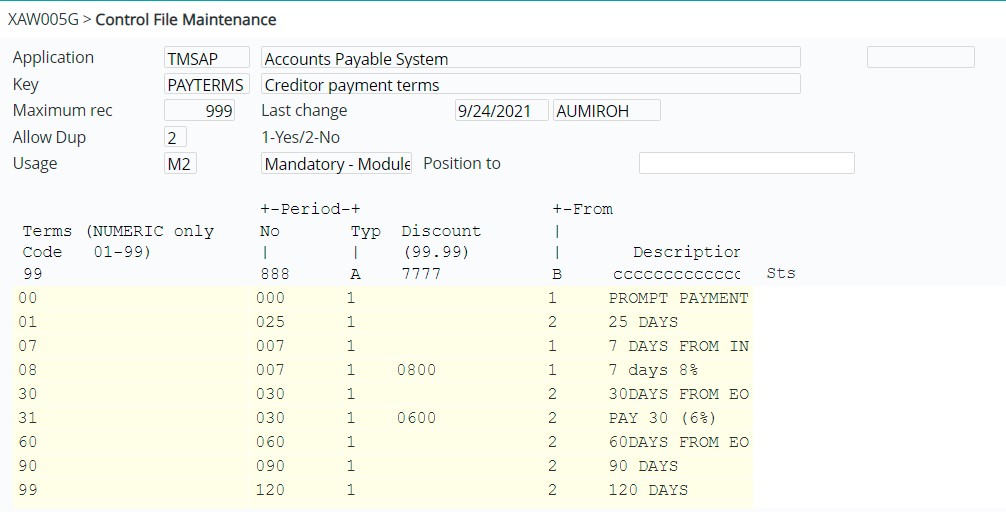
- TMSAP/PAYTERMS Creditor payment terms
Setup applicable discount rates for early payment by creditor payment terms.
- TMSWH/WI-QUEUE Warehouse background processor tasks
The background jobs for AP-Medius interface (invoice import, payment export and masterfile acknowledge) must be setup in this system control file with the appropriate run time frequency.
| Note | If a program is to be run when the background job processor is started, set the column ‘Initially run program’ to ‘1’. Otherwise the program will be held until manually set to run in Background Job Manager (WIM500). |
Interface setup
After all the business rules are setup then the following interfaces must be set in IP1.
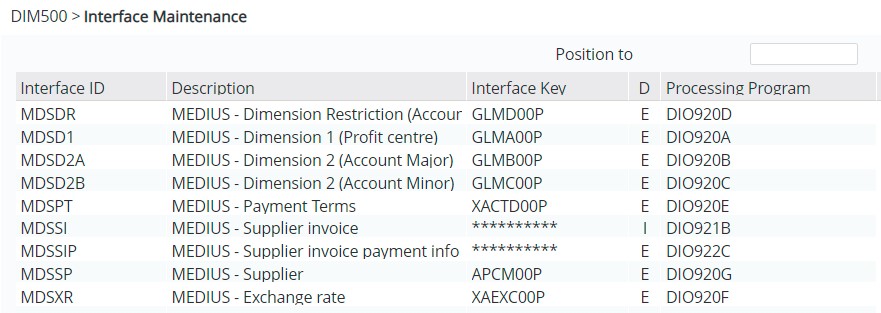
Setup interfaces for import/export files
For each file to be imported/exported to/from IP1, an interface needs to be setup to define the programs associated with the interface. The following interfaces must be setup:
- MEDIUS Dimension Restriction (Account) – export
- MEDIUS Dimension 1 (Profit centre) – export
- MEDIUS Dimension 2A(Account Major) – export
- MEDIUS Dimension 2B (Account Minor) – export
- MEDIUS Payment Terms – export
- MEDIUS Supplier invoice – import
- MEDIUS Supplier invoice payment info – export
- MEDIUS Supplier – export
- MEDIUS Exchange rate – export
- Select menu option DI Interface Maintenance from Other Options> Data Interfaces> DI: Interface> Interface Management menu. DIM500 Interface Maintenance panel appears.
- Click Add to add the interfaces for each of the above. The setting for all the masterfiles are similar.
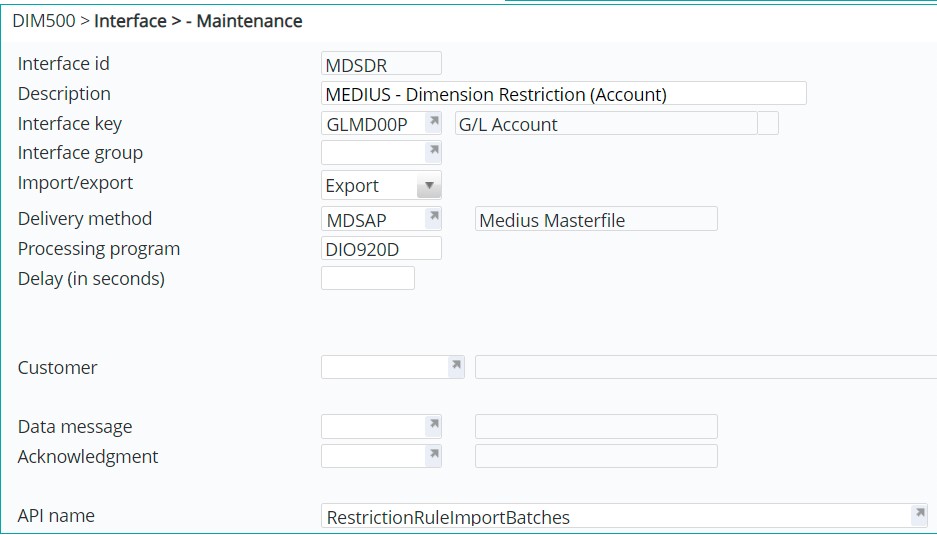
| Field | Description |
| Interface ID | Up to 10 character code to identify each of the interfaces to and from Medius. |
| Description | Brief description to identify the data being interfaced to/from Medius. |
| Interface key | This is the interface key as defined in TMSDI/LOB-KEY for the database relationship. The interface key is used to trigger the interface from IP1 to Medius and should only be setup for those interfaces that require triggers to interface. |
| Interface group | Leave blank – not applicable for AP -Medius interface. |
| Import/export | Select I for Import interface or E for Export interface. |
| Delivery method | This is the delivery method as setup in TMSDI/LOB-DLVM (based on the http request to Medius). |
| Processing program |
These are specific processing programs for each interface to handle different Interface processing:
|
| Delay | Time delay in seconds for the import/export process to begin after a record has been changed. The delay allows any other files to be updated in the background to be finished before the interface can begin. |
| Customer | Leave blank – not applicable for AP -Medius interface. |
| Data message | Leave blank – not applicable for AP -Medius interface. |
| Acknowledgement | Leave blank – not applicable for AP -Medius interface. |
| API name | Specific API’s for interfacing to Medius as supplied by Medius. The http request to Medius is composed of the URL for the delivery method (setup in control file TMSDI/LOB-DLVP) plus the API name specified here for the interface ID. Note: If there is only one API it can be added to the URL instead of entering it here. |
Setup/start trigger data queue
Data queue must be setup and activated for the interface trigger program to export delta changes from IP1 to Medius.
- Select menu option DI Interface Data Queue from Other Options> Data Interfaces> DI: Interface> Interface Management menu. XAW000 Work with Data Queues – Selection panel appears.
- Click Add to add the data queue. XAW000 Work with Data Queues panel appears.
| Field | Description |
| Data Queue | Name for the data queue. |
| Description | Brief description of the data queue. |
| Function | Function group is ‘DILOPT’ as setup in system defined control ********/DQ-GRP for outbound database trigger. |
| Activation |
0 = Inactive – Automatic interface updates will not occur. 1 = Manual – to be started manually for automatic interface updates. With manual setup you will need to manually access the Data queue and activate the processor. 2 = Auto – EOD will check and stop the data queue on start of EOD and restart it when EOD is finished |
| Program | Interface trigger program for data queue (DIO520A). |
- Enter the above information and click OK to create the data queue.
- Select the newly created data queue and click function Create queue to initialise/setup the queue and all the necessary components. Create queue function must be used on newly created data queues. When this function is activated you will see the new data queue on the selection list.
- Select the data queue and activate it.
Turn on/off trigger for data interface
The triggers setup for automatic interface (TMSDI/LOB-TRIG) can be turned on/off as required. For automatic interface on master record change ensure the triggers are turned on.
- Select menu option DI Interface Database Trigger from Other Options> Data Interfaces> DI: Interface> Interface Management menu. DIO500 Database Trigger Management panel appears.

- Select to add all triggers to start the trigger program.
Review End of day processing
End of day program (DSCEOD) must be reviewed if the data queue is setup with activation option 2 = Auto (EOD to stop/start data queue). EOD program currently does not look at the data queue activation flag, hence it needs to be modified.
Schedule/activate background processor
Activate the following background processor jobs:
- Supplier invoice import from Medius (DIO542A)
- Payment information export to Medius (DIO922B1)
- Masterfile acknowledgement from Medius (DIO537)
- Select menu option DI Schedule Job Management from Other Options> Data Interfaces> DI: Interface> Interface Management menu. WIM500 Background Job Manager panel appears.
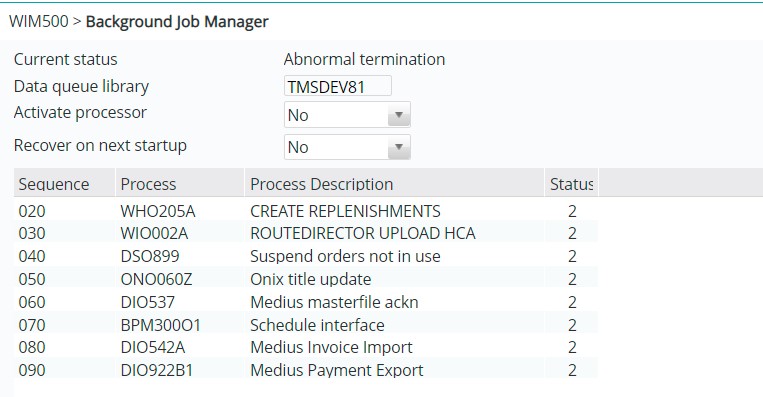
| Field | Description |
| Activate processor |
Yes = activate the background processor; all the jobs in the background processor that are flagged to run will run. No = deactivate the background processor, hence none of the background jobs will be running. |
| Recover on next startup |
Yes = the background processor will begin processing from where it stopped, so all the interface records that didn’t get processed when the background job was deactivated will be get processed now. No = will begin processing records from when its activated. This option would be used when there is no activity in the time when the processor was inactive or when starting for the first time. |
| Option | Description |
| Run | Use this option to activate a job. The processor must be activated for the job to run. |
| Hold | This will hold the selected job from running. |
| Note | The run/hold options set here will override the initial vales set in control file TMSWH/WI-QUEUE. The initial values set in the control file is applicable only when background job processor is started, |
Medius processing
Administration/Import management
On Medius, the Administration icon lists all the masterfiles within Medius. You can search for specific files using the Name field.
The following masterfiles in Medius are interfaced from IP1 system.
- Supplier – AP creditor
- Restriction rule – Combination of COA that is allowed.
- Dimension value – Multiple COA values: Dimension 1 = profit centre, Dimension 2 = Account major/Account minor
- Payment terms – Payment terms and the applicable discount for early payment as defined in control file TMSAP/PAYTERMS.
- Currency rate – Exchange rate
When new or changed masterfile records are exported to Medius, Import Management is used to monitor all the incoming records. It lists all the interfaced records from IP1 with a status and specifies if the record was successfully imported. When any record is exported to Medius, a cryptic key is generated by Medius which is updated to IP1 by IP1 Masterfile acknowledgement program (DIO537). This program runs in the background processor in IP1. If a record is not successfully imported into Medius, cryptic key/item id can be used to investigate and reprocess selected records.
Dashboard
The dashboard lists all the AP invoices in the Medius system. The invoices are either entered or scanned into Medius with most of the data automatically captured from the scanned document. Once the supplier invoices are checked and validated, it gets approved to be interfaced to IP1 for payment processing.
IP1 Interface management
Export master data manually
The initial upload of masterfiles to Medius is done manually via I/F option in the Interface Maintenance program (shown below). With the manual upload you can setup selection rules that can be applied to outbound data. After the initial upload automatic interface must be triggered on master record changes that are setup for trigger uploads.
Initial upload of supplier database excludes all closed accounts. A list of these excluded account is maintained so any future changes to these excluded supplier accounts will not be interfaced to Medius.
- Select menu option DI Interface Maintenance from Other Options> Data Interfaces> DI: Interface> Interface Management menu. DIM500 Interface Maintenance panel appears.
| Option | Description | ||
| I/F | This option is for manual interface, it takes you to the Interface Outbound Processor panel (DIO530) where you select/enter the following fields:
Mode: 0 (replace) – this will delete all previously sent data that are stored in the history log file DIHL and send all records based on the selection rules linked to the interface ID 1(update) – this will send only those selected records where there is a change from the previously sent data that are stored in the history log file. 2 (resend) – this will send the selected records regardless if there were changes to the previously sent data. Key: With modes 1 and 2 you have to specify a specific key or use ‘*’ for all keys. Key value is not required for mode 0 as all records are sent again.
| ||
| Selection |
Use this option to set up the product selection rules for the outbound data. To use this option
| ||
| Log | Accesses the interface history log file and lists all the processed keys for the selected interface. See Daily processing section below on how to manage history logs |
Background job processing
The active background job processor will run the following jobs in the background at the specified frequency (as setup in TMSWH/WI-QUEUE) and update history log.
- Supplier invoice import from Medius
- Payment information export to Medius
- Masterfile acknowledgement from Medius
Export supplier payment information manually
While the background job runs to export the daily payment information, you can also use the below menu to manually export the payment information for a specific process, day or period if required.
- Select menu option MEDIUS Invoice Payment Info from Other Options> Data Interfaces> DI: Interface> Outbound Data menu. DIO922 MEDIUS Interface Outbound Inv Payment Info panel appears.

- Enter one of the following and click OK to initiate the export to Medius:
- Process number – payment process number for which payment information is to sent
- Control number – daily control number to include all payment information for that specific day
- Period – payment information of the whole period
Daily processing (View history log & take relevant action)
Interface maintenance program also allows you to view the detailed history log for the incoming/outgoing interface data and take relevant action, for example reprocess/resend etc. You can use the Last log function key to view only the last log for the processed key or all logs.
- Select the Interface ID with option Log. History log for the selected Interface ID appears. All the processed keys are listed in reverse historical order, with the latest at the top of the panel.
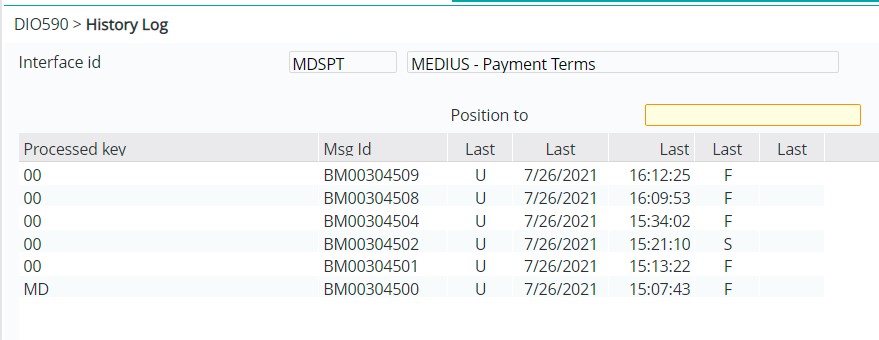
| Field | Description | ||||||||||||||||||
| Processed key |
The processed key for each of the interfaces:
| ||||||||||||||||||
| Msg ID | Message ID for the outgoing/incoming data. ID for outgoing data is defined in Control Number file DI-MSGID. | ||||||||||||||||||
| Last action | This is the last action that was taken for the relevant log. F = full replacement, there was no prior history. I = insert; this is a new addition U = updated changes only | ||||||||||||||||||
| Last date & time | Date and time of the last action. | ||||||||||||||||||
| Last ack |
This is the status of the last acknowledgement. It can be any of the following: S = Successfully sent and acknowledged E = Sent with error (usually there is a response attached to the error) F = Failed to be sent Blank indicates that it has been sent but not acknowledged yet. | ||||||||||||||||||
| Last | ‘*’ indicates that there is a response for that processed key. Usually if the Last acknowledgement = E for error and there is a response with the error message then an ‘*’ would be be used. |
| Function | Description |
| Last log/All logs/Last msg | This function toggles to display the last log or all logs or the last message. |
| Repeat | Repeats the delete option on every line to save you from entering delete on every line. |
| Filter | Filter functionality allows you to filter down the log using specific filter fields e.g. Action, Entry Date & Time and Acknowledgement. |
| Option | Description |
| Batch |
This option allows you to view the details of the log for the selected processed key, view any error response and take any of the following actions as required:
Note: Reprocess function will not appear if the delivery method has REST Handler program defined in control file TMSDI/LOB-DLVM. When looking at the details of the processed key, you can use function View to view the XML content. |
| Delete | Allows you to delete the selected log. If you are deleting all/multiple logs use function Repeat. |
Purging
Purging functionality is available and should only be considered for transactional data (if required at all), but not for masterfile data. Masterfiles can not be purged because the historical log is needed for comparison to determine whether delta is to be exported or not (i.e. when a new message is generated for a masterfile interface, it is compared with what is already sent; only when its not identical then the new message is interfaced).
