Contents
Introduction
The facility to be able to download data from IP1 to Excel and vice versa is available in a number of programs. The process uses an Excel template to map the data between IP1 and Excel and calls a common routine for the data upload and download.
An Excel processor (XAO166) exists to handle the actual generation of Excel data from IP1 and the uploading of Excel data to IP1. This processor can be called by any program that requires the Excel download and / or upload process.
Setup
Templates and control files and document exchange data must be setup for Excel upload and download to and from IP1 with support from IBS consultants.
Note: This document does not cover customized setups for specific companies. The purpose of this document is to assist IBS consultants to setup appropriate business rules at a customer site for the specified process.
Template setup
- The templates are Excel files that has all the data fields required for the upload or download. A standard set of templates is supplied by Iptor.
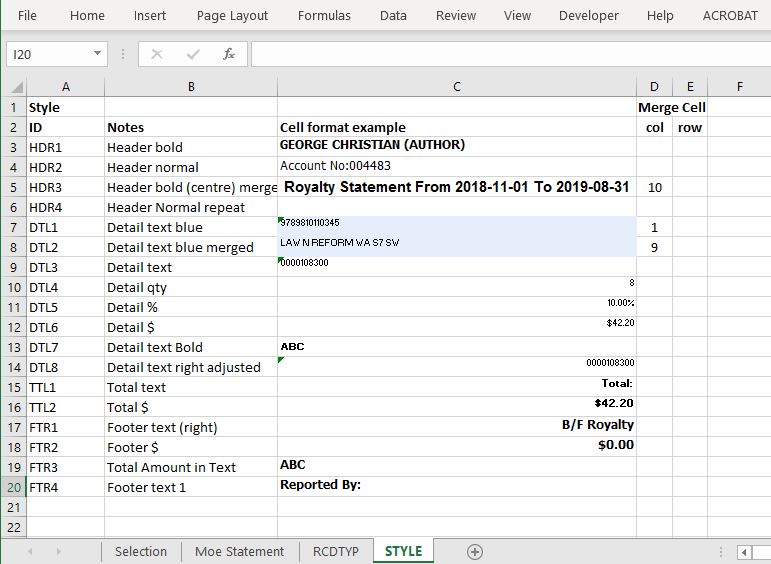
The first n rows of the template will have the following as the first column:
- *FMT – this row has the format The actual format name is on the second column and will normally be the program name suffixed with W1 (first sheet), W2 (second sheet) etc.
- *HDR – this row has all the field names used by the The field names starts from third column onwards and are program dependent. There can be up to 99 *HDR rows. The second column on the first *HDR row (ROWNUM) is system generated and is mandatory for uploading. This column is use to sequence multi-row detail lines. The row numbers on the detail lines will appear as RR.00 to RR.nn where RR is the row number and nn are the row sequence numbers, starting with 00 as the first row. There must also be a column marked ‘ERRMSG’ on the first *HDR row. This is use to display the error messages.
- *DTA – this row is not used by However; user defined column headings can be entered for each *HDR row field name. The area after this row identifies the start of spreadsheet data.
After the template has been created, it is recommended to hide the *FMT and *HDR rows and the first 2 columns for ease of maintenance of the actual data that are uploaded and downloaded.
Below are examples of some *HDR attributes.
“1” – Blank= blank output
“2” – .string=output the string literal
“3” – Work file field name=output corresponding value of the field name.
Other attributes that can be defined:
- Work file field extended function=output corresponding value of the field name qualified by the extended function. E.g.: SEQDM.AUT=output will be contact with contact type of ‘AUT’. This will be handled by the specific program generating the Excel file.
- .=(formula)=output will be the formula that will be used by Excel when the data are generated.

Additional definitions to the template allow formatting. The work file that is created for each excel output request has a field (RCDTYP) that identifies the record type. The record type has a corresponding style definitions defined in the Style spreadsheet within the template.

Other setup
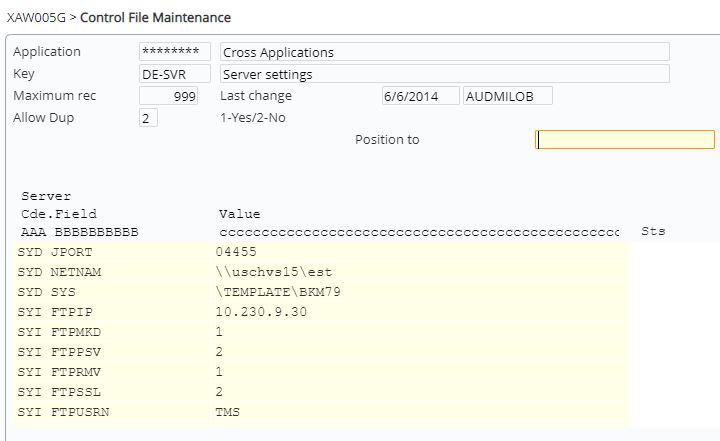
- Set up the network and folder details for the templates and the data files by server codes in control file ********/DE-SVR using fields ‘NETNAM’ and ‘SYS’ respectively.
Different server codes can be set-up for the excel upload/download location by functions and / or user groups in the Document Exchange maintenance; (Other Options>Cross Applications Support>E-mail). Each user, as a contact, is linked to a user group as defined in the contact attribute.

- Enter the relevant upload/download program (Function).
- Enter the relevant user group that should have access to the
- Select the server code as defined in control file ********/DE-SVR. Relative path can be an existing folder; if not, then it will be The server IP, network and system path will default depending on the server code selected.
Process
The Java Agent must be running for all Excel uploads and downloads to and from IP1.
Download from iSeries to Excel
- Run the relevant download
- The system will locate the template at the user defined server and folder (refer to the setup section above).
- The relevant download program will initially create an Excel file with a file name of UUUUUUUUYYYYMMDDHHMMSSSSXXXX in the user defined server and Where: UUUUUUUU – user name YYYYMMDDHHMMSSSSXXXX – run date and time.
- The downloaded file can be maintained and renamed by the user and can also be saved into their own folder as
- If the downloaded data is to be manually sorted, then *FMT, *HDR, and *DTA rows and the first 2 columns must not be These rows and columns are reserved for the system data attributes.
- The columns can also be re-arranged in any sequence as long as the column attributes are
Upload from Excel to iSeries
- Run the relevant upload.
- The upload program will prompt for the file name to be uploaded. The location of the upload file will be from the user defined server and folder. The data to be uploaded must be saved into this folder before you start to upload.
- The data will be validated for basic Excel errors such as non-numeric fields. Depending on the calling program, there can also be some IP1 validation prior to uploading the data.
